best keyboard shortcuts for Microsoft Outlook plus free cheat sheet
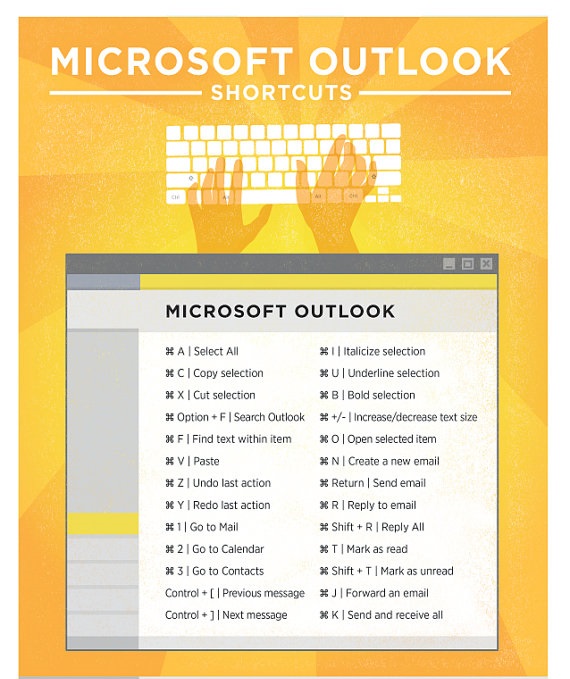
Outlook keyboard shortcuts for PC and Mac

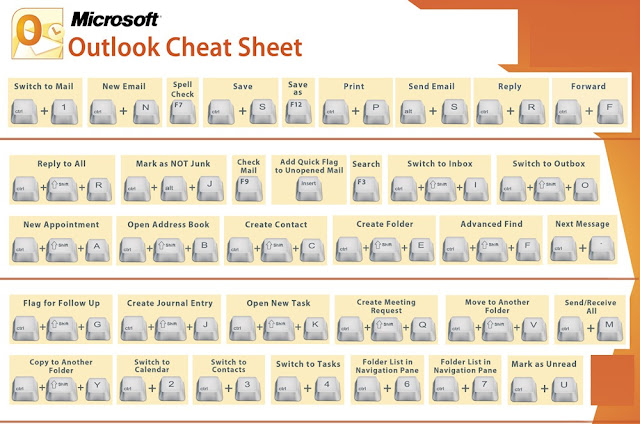
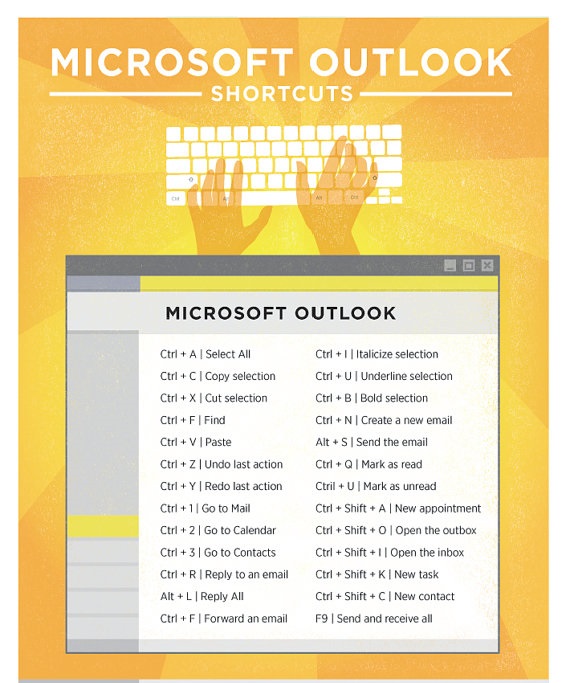
We've compiled a list of useful keyboard shortcuts that will help you move faster around Microsoft Outlook than using a mouse.
Below is a listing of all the major shortcut keys in Microsoft Outlook.
Go to a different folder: Do you manage a large number of mailboxes in Outlook? The shortcut "Ctrl+Y" saves you a lot of clicks and time when switching between the individual folders.
New message (from any Outlook view): It doesn’t matter which Outlook view you are currently using, the Microsoft Outlook shortcut "Ctrl+Shift+M" will open a new e-mail and save you the bother of fiddling with the keyboard AND the mouse.
New contact (from any Outlook view): The keyboard shortcut "Ctrl+Shift+C" saves time in adding contact data to your address book if you’ve made new business contacts at a conference or trade show.
Forward a message: Press "Ctrl+F" if the content of an e-mail would be of interest to your colleague Anna as well. This Outlook shortcut lets you forward your messages in an instant.
Open the address book: No matter if you want to contact old business partners or new ones, you’ll find it a tad easier to open the address book using the Microsoft Outlook shortcut "Ctrl+Shift+B".
Expand the search to include all mail items, all calendar items or all contact items, depending on the module you are in: Darn it, where was that e-mail from Andrew? It can get quite tricky to keep things organized when dozens of e-mails are flooding in and the various folders in your mailbox are creaking under the load. Searching for names or key words is helpful here. The Outlook shortcut "Ctrl+Alt+A" expands the search to all folders.
Open the flag for follow-up dialog box to assign a flag: Everything hinges on your organization, especially in longer-term projects. The small follow-up flags help to group and sort all e-mails relating to one project. Use the shortcut "Ctrl+Shift+G" to save yourself the bother of opening the dialog box to assign a flag.
New meeting request: Do you want to bring your colleagues up-to-speed with the latest developments in your project? Simply use the keyboard combination "Ctrl+Shift+Q" to send your team a meeting request.
Create a Microsoft Office document: A colleague sends you an e-mail to let you know that a cost summary for a certain project is needed urgently. On the spot, if possible. Press "Ctrl+Shift+H" in Outlook to immediately open an Excel spreadsheet or another Office document.
Insert a hyperlink: The video about cats you just watched on YouTube was so side-splittingly amusing you simply have to share it with your colleagues? The keyboard shortcut "Ctrl+K" makes it that bit easier to add web content to your mails.
How to Use Microsoft Outlook keyboard shortcuts
Keyboard Shortcuts
New Item Ctrl + NSearch Ctrl + E
Save Ctrl + S
Preview and Print Ctrl + P
Check Spelling F7
Check for Mail F9
Save, Close, Alt + S
Undo Ctrl + Z
Cut Ctrl + X
Copy Ctrl + C
Paste Ctrl + V
Reply Ctrl + R
Reply to All Alt + L
Address Book Ctrl + Shift + B
Help F1
Switch Between Alt + Tab
Applications
Alt + . (period) Open the Address Book with the To field selected
Alt + A Open the Action drop-down menu
Alt + B Open the Address Book with the BCC field selected
Alt + C Select message recipients for CC field
Alt + D Switch to Daily calendar view
Alt + E Open the Edit drop-down menu
Alt + F Open the File drop-down menu
Alt + G Open the Go drop-down menu
Alt + H Open the Help drop-down menu
Alt + I Open the Find tool bar / Open the Insert drop-down menu
Alt + J Move to the Subject field
Alt + K Check names in the To, CC, or BCC field against the Address Book (cursor must be in the corresponding message header field)
Alt + L Reply All
Alt + M Switch to Monthly calendar view
Alt + N Open the Accounts drop-down menu
Alt + O Open the Format drop-down menu / Switch to Today calendar view
Alt + P Open the Message Options dialog box
Alt + R Reply / Switch to Work Week Calendar view
Alt + S Send
Alt + T Open the Tools drop-down menu
Alt + V Open the View drop-down menu
Alt + W Forward an item / Switch to Weekly calendar view
Alt + Y Switch to Daily calendar view
Ctrl + 1 Go to Mail
Ctrl + 2 Go to Calendar
Ctrl + 3 Go to Contacts
Ctrl + 4 Go to Tasks
Ctrl + 5 Go to Notes
Ctrl + 6 Go to Folder List
Ctrl + 7 Go to Shortcuts
Ctrl + 8 Go to Journal
Ctrl + A Select all
Ctrl + B Bold when editing a rich text message
Ctrl + C Copy selected text.
Ctrl + D Delete an item (message, task, contact, etc.)
Ctrl + E Activate the Find drop-down menu / Center Align when editing a rich text message
Ctrl + F Forward
Ctrl + J Open a new Journal Entry from the selected item (message, task, contact, etc.)
Ctrl + K Check names in the To, CC, or BCC field against the Address Book (cursor must be in the corresponding message header field)
Ctrl + M Send/Receive all
Ctrl + O Open
Ctrl + P Print selected text.
Ctrl + Q Mark the selected message Read
Ctrl + R Reply
Ctrl + S Save a draft message
Ctrl + T Tab
Ctrl + U Mark the selected message Unread
Ctrl + V Paste
Ctrl + X Cut
Ctrl + Y Go to Folder
Ctrl + Z Undo
Ctrl + Enter Send the e-mail you're composing.
Ctrl + Backspace Delete the previous word
Ctrl + End Move to the end
Ctrl + Home Move to the beginning
Ctrl + Shift + A Open a new Appointment
Ctrl + Shift + B Open the Address Book
Ctrl + Shift + C Create a new Contact
Ctrl + Shift + E Open a new folder
Ctrl + Shift + F Open the Advanced Find window
Ctrl + Shift + G Flag message for follow up
Ctrl + Shift + J Open a new Journal Entry
Ctrl + Shift + K Open a new Task
Ctrl + Shift + I Open the Inbox.
Ctrl + Shift + L Open a new Distribution List
Ctrl + Shift + M Open a new Message
Ctrl + Shift + N Open a new Note
Ctrl + Shift + O Switch to the Outbox
Ctrl + Shift + P Open the New Search Folder window
Ctrl + Shift + Q Open a new Meeting Request
Ctrl + Shift + R Reply All
Ctrl + Shift + S Open a new Discussion
Ctrl + Shift + U Open a new Task Request
Ctrl + Shift + Y Copy a Folder
Ctrl + Shift + V Move folder.
Shift + Tab Select the previous message header button or field
F1 Open Outlook Help
F3 Activate the Find toolbar
F4 Open the Find window
F7 Spellcheck
F9 Send and receive all
F10 Select File from the Outlook toolbar button
F11 Activate the “Find a contact” dialog box
F12 Save As
Alt + F4 Close the active window


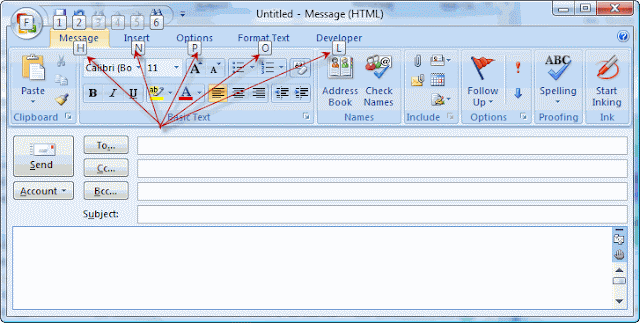
Underlined letters indicate the ALT keyboard sequences in Outlook 2007 and previous.
When you are in an area which has the Ribbon (like when creating a new message in Outlook 2007 or later), the keys to press will float above the options.
After pressing the key for a specific section, keys for the next section will be shown.
Using ALT keyboard sequences
To start, you must press the ALT key once (you can release the key directly, you don’t need to continue to hold it). Then type the characters one after the other to select the option that you want.


Microsoft Office Outlook keyboard shortcuts
Microsoft® Outlook Quick Reference

The Fundamentals
- The File tab menu and Backstage view contain commands for
working with a program’s files, such as Save As, Save
Attachments, Close, New, and Print.
- To Check for New Messages: Click
the Send/Receive All Folders button
or press F9.
- To Preview and Print a Message:
Click the File tab and select Print, or
press Ctrl + P.
- Message Indicators:
Message has not been read.
Message has been read.
File is attached to the message.
Message has high or low
importance.
- To Minimize the Ribbon: Click the
Minimize Ribbon button on the
Ribbon. Or, press Ctrl + F1. Or, rightclick
a tab and select Minimize
Ribbon from the contextual menu.
- To Change Account Settings: Click
the File tab and select Info. Click the
Account Settings button.
- To Change Program Settings: Click
the File tab and select Options.
- To Get Help: Press F1 to open the
Help window. Type your question and
press Enter.
Contains mail-related folders like your Inbox,
Sent Items, and Search Folders. Use the
Favorites section at the top of the pane for easy
access to frequently-used folders.
Enables you to view and schedule
appointments, event, and meetings. View
shared calendars and compare calendars by
viewing them side-by-side.
Store and keep track of addresses, phone
numbers, and e-mail addresses.
Organize to-do lists, track task progress, and
delegate tasks.
Notes: Use like electronic Post-It® Notes to write
down information.
Folder List: Displays a list of all your Outlook
folders.
Shortcuts: Add shortcuts to folders and
locations in Outlook for quick access.
Mail: Basics
- To Create a New Message:1. Click the New E-mail button in the
New group of the Home tab on the
Ribbon. Or, press Ctrl + N.
2. Enter the e-mail address(es) in the To:
box, or click the To button to use the
Address Book.
3. Click the Cc: or Bcc: buttons and
enter the e-mail address(es) for whom
you want to send copies of the
message.
4. Enter the subject of the message in
the Subject box.
5. Enter the text of your message in the
text box.
6. Click the Send button.
- To Reply to a Message: Select/open the
message, click the Reply button, type
your reply, and click the Send button.
- To Forward a Message: Select/open the
message, click the Forward button, enter
the e-mail address(es) in the To field,
enter comments in the Body area, and
click the Send button.
- To Delete a Message: Select the
message and press the Delete key.
- To Open a Message: Click a message
to view it in the Reading Pane or doubleclick
the message to open it.
Mail: Advanced Tasks
- To Attach a File to a Message: Click the Attach Item button in the Includegroup of the Message tab in the Message window.
- To Preview an Attachment: Click the attachment in the message preview in
the Reading Pane.
- To Open an Attachment: Double-click the attachment in the Reading Pane.
The file opens in its default program.
- To Flag a Message as a To-Do Item: Right-click the message, select Follow
Up from the contextual menu, and select a flag. Or, click the flag icon on
the message. Or, select the message, click the Follow Up button on the
Standard toolbar and select a flag.
- To Categorize a Message by Color: Click the Quick Click icon on the
message. Or, right-click the message, select Categorize from the contextual
menu, and select a color category. Or, select the message, click the
Categorize button in the Tags group of the Home tab on the Ribbon, and
select a flag.
- To Recall a Message: Open the Sent Items folder. Double-click the
message, click the Actions button in the Move group of the Message tab on
the Ribbon, and select Recall This Message. Choose to delete the message
or replace the message with a new one in the dialog box and click OK. You
can only recall a message if you are using MS Exchange Server and the
recipient has not opened it.
- To Resend a Message: Open the Sent Items folder. Double-click the
message, click the Actions button in the Move group of the Message tab on
the Ribbon, and select Resend This Message. Edit the message and
recipients as necessary and click Send.
- To Create a Contact Group: Click the New Items button in the New group
on the Ribbon and select More Items Contact Group. Click the Add
Members button in the Members group on the Ribbon, select a name in the
list, click the Members button, and repeat for each name to be added. Click
OK, then click Save & Close in the Actions group of the Contact Group tab.
- To Create a Signature: In the message window, click the Signature button in
the Include group of the Message tab on the Ribbon, select Signatures, and
create the new signature.
- To Change a Message’s Options: In the message window, click the
Options tab on the Ribbon and click the More Options dialog box
Launcher. Here you can specify: if the message is important or sensitive; if
you want to add voting buttons to the message; where replies should be sent
to; if you want a read receipt; and if you want to encrypt the message or delay
its delivery.
- To Move a Message to a Different Folder: Select the item, click the Move
button in the Move group of the Home tab of the Ribbon, and select the
destination folder. Or, click and drag the item to a different folder in the
Navigation Pane.
- To Turn On the Out of Office Assistant: Click the File tab, select Info and
click the Automatic Replies button.
- To Save a Message as a Draft: Click the Save button on the Quick Access
Toolbar in the message window. The message appears in the Drafts folder.
- To Create a New Rule: Click the Rules button in the Move group of the
Home tab on the Ribbon and select Create Rule.
- To Manage Rules: Click the Rules button in the Move group of the Home tab
on the Ribbon and select Manage Rules and Alerts.
Calendar
- To Open the Calendar: Click the Calendar button in the Navigation Pane.- To Change Views: Click a view option in the Arrange group on the Home
tab, or click the View tab and select an option there.
- To View a Specific Date: Click the date in the Date Navigator, or click and
drag to view a set of consecutive dates.
- To Schedule an Appointment: Click the New Appointment button in the
New group on the Home tab or press Ctrl + N.
- To Schedule a Recurring Appointment: Click the New Items button in the
New group on the Ribbon, and select More Items Recurring Appointment.
- To Schedule a Meeting: Click the New Meeting button in the New group on
the Ribbon. Add recipients and meeting details and click Send.
- To Schedule an All Day Event: Click the New Items button in the New group
on the Ribbon and select All Day Event.
- To Reschedule an Item: Click and drag the item to a new date and/or time
on the Calendar. Or, double-click the item to open it, make your changes, and
click the Save & Close button in the Actions group on the Ribbon.
- To Edit an Item: Click the item to view the Calendar Tools contextual tab. Or,
double-click the item, make your changes, and click the Save & Close button
in the Actions group on the Ribbon.
- To Delete an Item: Select the item and press Delete. Or, select the item and
click the Delete button in the Actions group of the Appointment tab on the
Ribbon.
- To Search the Calendar: Click in the Search box in the upper right corner, or
press Ctrl + E. Type search keywords and press Enter.
Tasks and To-Do Items
- To Open Tasks/To-Do List: Click the Tasks button in the Navigation Paneand select To-Do List or Tasks in the Navigation Pane.
- To Create a New Task/To-Do Item: Click the New Task button in the New
group on the Home tab or press Ctrl + N.
- To Complete a Task: Click the Mark Complete button in the Manage Task
group on the Ribbon, or click the task’s check box in Simple List view.
- To Delete a Task: Select the task and press the Delete key. Or, click the
Delete button in the Delete group of the Home tab.
Can we ask you a favor? Can you please share this page if it's useful to you? Thanks!
Thank you for your continuing supports!
http://www.noktayardim.com
http://noktayardim.blogspot.com.tr/

No comments:
Post a Comment